AWS - JSON To PDF - Invoice Tutorial
This tutorial shows you how to run ReportLab in an Amazon Web Services (AWS) instance, deployed via Elastic Beanstalk (EB). This is a small app that includes a web form that will produce a sample PDF.
Prerequisites
Prior to starting, make sure that your local python has a version that matches the AWS EB pythons. As at March 2020, AWS EB supports 2.7, 3.4 and 3.6.
It is assumed that you have an AWS account already and that you have access to the account credentials (access key id & secret access key).
Part 1- On You Local Machine
-
Create a Python Virtual Environment:
python -mvirtualenv sample-aws -
Change directory to sample-aws and activate the virtual environment:
cd sample-aws . bin/activate -
For Python 2 download this zip file. For Python 3 download this zip file.
-
Unzip the zip file
-
If you don't already have an account, sign up for one.
-
Edit requirements.txt - put in your username & password in the last line (the pypi url)
-
Install the the Python packages with pip (put your path to requirements.txt):
pip install -r requirements.txt -
You will also need to install AWS command line interface package, either via pip (
pip install awsebcli) or as a system wide package (awscli) -
Check that json2pdf/settings.py has 'localhost' in ALLOWED_HOSTS, if it is missing then add it.
-
If running Python 2.7, change directory to json2pdf
-
Start the local runserver:
python manage.py runserver -
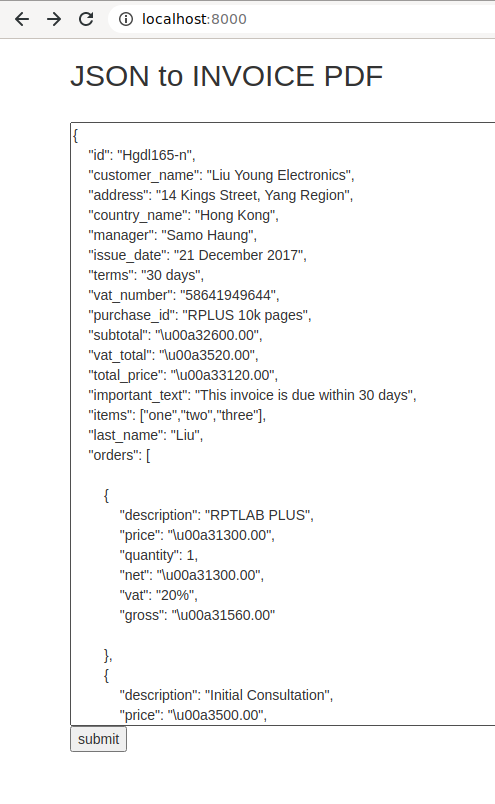
To check the application runs locally, point your browser at localhost:8000
You should see JSON data in a form.
-
Click 'submit' and make sure you see the sample invoice before proceeding further

-
Shutdown the local server
Part2 - Set Up Amazon Elastic Beanstalk
-
Add your aws host instance to ALLOWED_HOSTS in settings.py
-
Initialise the app, in doing so AWS will ask you what region to create the instance in.
eb init -p python-{2.7,3.4,3.6} sample-aws eb init #OPTIONAL eb create sample-aws-env -
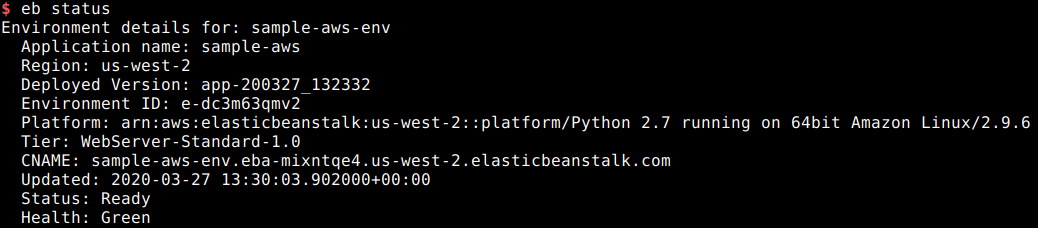
To get the remote name, run the following command:
eb status -
Add the name (the CNAME field) to allowed hosts in joson2pdf/json2pdf/settings.py
-
Create directory:
mkdir .ebextensions -
edit the file .ebextensions/django.config and create something like this (where WSGIPATH is the correct path for our app's wsgi.py file). Take care to indent accordingly;
option_settings:
 aws:elasticbeanstalk:container:python:
 WSGIPath: json2pdf/wsgi.py
Part 3 - Deploy
-
Deploy, then optionally terminate/deactivate when done
eb deploy -
The following command will show data including the CNAME field (it will most likely end in *.elasticbeanstalk.com).
eb status
- Put the CNAME field into your browser. You should see your sample invoice app as per Part 1 of this tutorial. If you no longer want to run this app anymore on AWS EB, you can terminate it
eb terminate

deactivate